Community Favorites

Friday, July 22, 2016

Using Multple embossing powders


I LOVE my nautical stamps so much !!
I thought this would be the perfect project for a technique I made up.  I don't know if this is something others have shared, but I have messed with using multiple embossing powders on one project and I thought I would share how I do this with all of you !!


I have used this technique on many shapes, always starting from the outside in, but with the introduction of the MISTI stamping tool this is now much easier as you can color only certain parts, emboss, re-stamp and emboss again. The only problem I have with this is the reheating of what is already embossed, overlapping the "re-ink & sprinkle" stage AND not everyone has a MISTI !!


After choosing the image you'd like to stamp and heat emboss, choose the colors of embossing powder you'll be using and a scrap paper for each one to catch the excess powder. A lot of you use your powders from a small tub and spoon it over your project and this works ideally too.  I just don't have that kind of quantity in my colored powders!

Right is a photo list of the products used :)


I heavily recommend using an antistatic "embossing buddy". I got mine from Stampin' Up! but I'm sure they're sold by most paper craft retailers.  It is a little pillow full of corn starch I think, & tapping and rubbing it across any surface that will come in contact with your embossing powder keeps the powder from sticking where you don't want it.  I also use a small paint brush to remove any spots that I don't want showing up.  (The Embossing Buddy makes this nearly unnecessary)

I did use my MISTI to stamp, but an acrylic block would have worked the same for this technique.  Prep the paper with the anti-static Embossing Buddy.  Also prep the papers used to catch any spillage when using powders or glitters. This will make it lots easier to conserve every drop of unused powder.

I like to have it all set up in the order I want to use the powders with the lids off so that I can move quickly before there is a chance of spots of VersaMark drying out & not holding the embossing powder.  After I mounted the stamp in the MISTI with the paper held in place I inked her up with VersaMark clear embossing stamp pad. If you're using a MISTI you can do this step twice to insure a really nice coverage.  Just stamp your image and then ink up & stamp again without moving the stamp or paper.


REMEMBER TO CLICK ON PHOTOS FOR CLOSE UP IMAGES


Now for the quick part.  I sprinkle the first powder on out side edges of the stamped (mostly invisible) image.  Shake off onto the paper underneath remembering that where ever you allow the powder to flow - as it leaves the image  -will be coated & embossed in that color.

The first sprinkle of Powder-copper, poured off
direction of the corner so no powder touched
other areas.
Below is the second sprinkle - Gold
Go to the next powder color & apply to the next outside edge or up against the first color.  Shake off the same way, kowing that what it flows across (except for the already covered area ) will attract and be embossed as this second color.  I used gold, copper and deep green. Shake this off and so on.  You can repeat colors, or what ever.  If you wanted one color in the center only you would leave that space untouched until last and then when you shake it off it will mostly pass over the already coated areas & leave that color only on the patch of unused VersaMark. 


The original image now completely covered with
embossing powder, but not yet heated.  Now is 
the time to gently brush away stray particles
that you don't want marring your image. 

Each color of powder should be nearly free of foreign color (I do this a lot & have noticed no contamination) & can be returned to it's own bottle by lifting and funneling it with the catch paper.

Heat the image as usual until all of the powder changes it's texture from a dull powdery look to a nice high gloss, raised image.

After you've done it a couple of times it is really quite quick and easy and I think the results are stunning :)

I hope you enjoyed this idea & tutorial, I will be adding another how-to on creating  sparkle in ANY embossing image without having to purchase a bunch of different embossing powders!!!  Also keep watching for my completed Mermaid Project !!


PS After I was finished with the image  & before I heated it, I passed a sprinkle of gold over the whole thing. Only tiny bits stuck here and there & I really like the effect.  Experiment! Have fun!!

Saturday, July 16, 2016


My favorite Blog is probably Word Art Wednesday!  Every week they have new and inspirational AND FREE Scripture/Word Art! 


Oh, it is always just so lovely!  There is also a wonderful article to go with the selected scripture. EVERY WEEK they have a new card making challenge and I recommend you check it out ;)


Here is my card for this weeks challenge!  I love Proverbs 31. One of my girl friends read it from a bible translation that differs from my NAS and it was even more like poetry !  In any case, I hope this card inspires you to check out the scripture.


Supplies & insights:


Rubber Stamps https://www.unitystampco.com/shop/butterfly-garden-sw-kit/


Large round image cut out with circle die. Stamped in Stampin' Up Crumb Cake & accented with Baked Brown Sugar.  Colors Dry Brushed on small areas and gold "pearls" applied to center of large flowers.  To make sure the under stamping of the butterfly border was in the right place I used Stampin' Up!'s stamp positioner & embossed the pink portion with a border embossing folder Bit of Paisley from Cuttlebug https://shop.cricut.com/en_us/catalog/product/view/sku/2001294

Friday, July 15, 2016

Passion

I think that passion is an amazing word!  I love the deep emotional connection it implies when it is used to describe things.  For instance Love . . . . 
                                                                                                                . . . . or Hate


I know I can hate evil with passion or I can love chocolate passionately! 


Passion sets a soul on fire and that's what I tried to do with this card. The words "Passion Changes Everything" is so true! You can go to your job everyday and do good, but when its your passion, you can change the world. The task you are passionate about does not have to be anything large, it could be rather simple.  Purple is a passion color, and so I used it to add boldness to my card, and make an impact. I used orange & hot pink on the flowers to add a sense of vibrancy and light, because when its your passion, it shows. Card making is a passion of mine, and seeing an amazing creation really gets me excited. I love playing with the colors and testing different embellishments and cuts that I have never tried before. Often, we forget that simplicity can make an impact as well, and I felt that the white space I left really made the statement pop. instead of having your eyes travel around the entire card, they are drawn right to the sentiment.

Some FYI on making this card :)  Supplies will be listed below.  To begin with I stamped the sentiment in Black Versafine ink AFTER stamping it off twice on scrap paper, the third stamping was the shade I wanted.  I then stamped and embossed the flowers over the top allowing the scooped shape of the flower stamp to cradle the top line.  After water coloring (on regular paper) the flowers and stems with Zig Real Brush Water Color Markers, I decided the "Everything" didn't show up as much as I wanted. 


To get a second stamping that was exactly where the first was I used a Stampin' Up! Stamp-a-ma-Jig.  To be sure that the second inking didn't mess with the "passion changes" part of the sentiment I covered it with tape before inking the stamp.  I also  used a deep purple instead of the black.


 After it was inked and the Jig was set properly I pulled off the tape and stamped.  You can see that I save my tape scraps for pinning down my project so they don't move as I position them with the jig !!! My Big Shot is covered with scraps too!

Supplies: 


Floral Stamp (30% off this week at Jo~Ann Fabrics this week) http://www.joann.com/stampendous-cling-rubber-stamp-ranunculus-field/10780120.html


I would also like to give Georgia Falk a big THANKYOU!  for writing the entire second paragraph!  She is a literary genius!


Thursday, July 14, 2016

Super Mom!


For all of the Mom/Daughter relationships
 

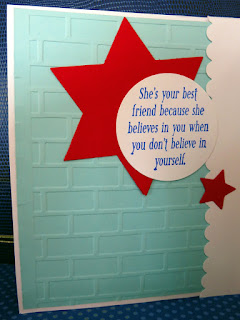
Mom's are our unsung heroes sometimes, aren't they?  When I saw this stamp set I fell in love! I put an "M" on her shirt badge and pieced her skirt with embossed dots.  I liked the urban feeling of the brick background and stamped the sentiment as if it were graffiti.  The frame is out of a retired set from Stampin' Up "Shining Star"


I also added the die cut red stars reflecting the negative of the white stars in the frame. 


For me, the inside is pretty special because so many kids have trouble believing in themselves.  I know my mom was my biggest champion and probably still is 


You might also notice that the inside is the debossed side of the brick wall.  It was so pretty I did not want to cover it so I cut the back of the card with enough extra to extend a small way across the front, enough to hold the original brick and still look intentional.  I like decorating the insides &/or back too!

Below is a list of supplies:


Laney Girl (aka Super Mom) designed by Angie Blom at Unity Stamp Co's web site( https://www.unitystampco.com/shop/laney-girl/ )


Inside sentiment "She's yor best friend . . . " From the KOM at Unity https://www.unitystampco.com/shop/happy-thankful-blessed-kom-914/ 


Sunday, July 10, 2016

Sending Happy Wishes


Wow!  What a busy last couple of weeks!  Traveling to my big brother's wedding, 4H conference in Corvallis, headlong into Spring Fair, replanting my garden, as we had several days below freezing & now on to Summer Camp (luckily I'm only driving there and back!!) Which means that as long as it is raining (Yes, I forgot to mention the arrival of rain! Beautiful, cool WET rain) I may have time for some crafting and blogging!!


First I would again like to thank Unity Stamp Company for my prize package which came somewhere in the midst of all of the above! $50 worth of beautiful stamps <3  I highly recommend visiting their store and Face Book sites and JOINING IN THE FUN !!

Which Brings me to my next subject:  Weekly Challenges!  Always inspirational, this week on the Unity show & tell FB page the challenge is: any item made with one of the "Unity Girls" 
This is the one I chose. She is from the Kit Of the Month MAY 2014.  I used a sentiment from a newer kit Sending Up Something Beautiful.

I needed to make a few birthday cards and the request was for bright colors.  I first water colored the image with my "Zig's" and then decided that this shade of pink (Pixie Pink from Stampin' Up!) went best with the colors I'd used.  I wanted the background to "pop" a little so I inked  my multi-striped embossing folder from The Paper Studio with Rose Red from Stampin' Up then embossing the pink cardstock which also transferred the color simultaneously.  I thought it was beautiful just like that!  Adding Black to the card made it a little more sophisticated and punching a lacey edge for the white card base gave it the vibe I was looking for. 


 I added the tag on the inside just to finish it off as a birthday card, but I could've left it as a note card otherwise.


Simple, beautiful and so full of celebration!