Community Favorites

Showing posts with label Digital. Show all posts

Sunday, July 9, 2017

PIP Challenge # 1728 ~ Enter to Win!!

Hello Loyal PIP Challenge Fans and Newbies alike!!! Welcome to DT inspiration card for the ANYTHING GOES Challenge #1728 sponsored by
 Follow the link and enter your card for a chance to win a great prize from Fabrika Fantasy who generously provided the digital Fantasy Pet that I used on this fun card.


What a great image! So rich with personality and detail.  I think next time I use it I will make it larger because it was a little difficult coloring the tiny details in.

It's a perfect stamp for a thank you card, with all of that pampering going on!! I used a sentiment from Hot off the Press,  "ThankYou!" I thought this card would make a great party invitation for a little girl too!! 

Simple & straight forward, I just printed, cut & colored, but here are a couple of highlights.  Her stylish shell hat was shimmered up with Iridescent Smooch, Stampin' Dazzle was used for gold accents and I mostly used colored pencils with blender pen for coloring.  Since this image was sprayed with workable fixative, the blender pen performed poorly (I thought) so be aware that there is a difference!! I also used NUVO Crystal Drops for accents like the necklaces, jewels and drawer pulls.

For whatever reason I could not get a great
picture of this card!!!  Her skin and hair always looked washed out!!! I thought the shell turned out really pretty though :)


Sunday, June 11, 2017

MHK & Coloring Digitals BEFORE PRINTING!!

Welcome to another fun Inspiration card for PIP Challenges!!  Our sponsor is MHK Designs & wow, do they ever have some great digital images!!  Stop by & check them out, they have great prices and you can get started within minutes, no waiting for the mail!!!
MHK generously provides the digis for our design team to use and I am in LOVE with their butterflies. 
As I have said in the past, I am kinda new at digis and I enjoy experimenting so I decided to  try coloring them before I printed them!!
Wow, it is really fun and addictive! I also used a "colored pencil" filter to change it up a little.  I really can say that I had a lot of fun with this!! Click the selection tool and select the areas that you will have reflect the same color/hue. 

I used a sliding scale to change the colors in the adjust colors tab of my Microsoft Digital Image Standard editing tool. 

If I want something very intense and can't get it there, the trick for me is to "finish" and then reselect adjust color and continue to max out the scale until I get the intensity I am looking for. 

I colored each butterfly separately & blown up large so I could easily see what I was selecting.  When each was finished I copied them to a clean doc - sizing & spacing them to match each other.  Then it was just a matter of printing them (make sure they are far enough off the edge to use your selected die, etc.)

For the label shapes I used matching dies in different sizes. To make the oblong ribbon of paper I first cut the rectangle and then poked each end into the area of the smaller die to make the side accents. 

ANOTHER incident worth noting: I scribbled in the background stripes based on another card I made but the color turned out more intense and the marker left overlap marks instead of the smooth look on the previous card. 
       
The difference?  The kitty card was sprayed with Workable Fixatif which must give the paper a smoother texture that doesn't absorb color as quickly.  I think I may start using it just for that property (I originally got it just to "set" the ink on digis).

To finish  I thought I would make the inside reusable, so I added a note card for my sentiment and/or handwritten note. I put it there with adjustable adhesive on the note card only, then the recipient could reuse the card if she chooses (& who wouldn't !!!!!)

Don't forget, click here to make any order requests on the "HI!" notes Facebook page!!

Sunday, May 14, 2017

Missing You Card for PIP Challenges #1720


Hello & Welcome to PIP Challenge Design Team Member (that's me!!)

INSPIRATION CARD!

This Week our challenge sponsor is Bugaboo Stamps! They always offer such generous prizes and they also provided me with this adorable digital image!!


I can think of so many ways to use this image but I really loved the missing you aspect because of the pretty little home scene!  To make my sentiment I just chose a font in "Word" and sized it to fit my image, printed it with enough space to do the die cutting I'd planned and - tada!! - all done!

A friendly reminder: I sprayed this with workable fixative before I started coloring. Last time I tried hair spray and although it worked I can tell you I like the way colors move on the fixative better. I used a marker to draw in the wall paper lines and the color went on smooth & soft.  I tried this again on a stamped card (so no need for fixative) and the marker left overlap marks and was much more intense - not the look I was going for so the Workable Fixatif might be fun to use on other projects as well :)

I used this die to cut the label shapes (check it out on Amazon - AMAZING price!!) and embossed coral paper with a Sizzix embossing folder.
https://www.mftstamps.com/catalogsearch/result/?q=Nuvo+jewel+drops


https://www.mftstamps.com/catalogsearch/result/?q=NUVO+glitter+dropsThe really fun part? Figuring out where to use some Nuvo Drops!! The purple- Nuvo Glitter Drops in Purple Rain- and the orange - something brand new Nuvo JEWEL Drops in Orange Marmalade.  Wowzers!! These are so pretty I wanted to put them everywhere!! The jewel drops are kinda see through and the colors are amazing :)

 
Hopefully you're feeling inspired and I look forward to seeing your entry in this weeks PIP Challenge!!! 

Sunday, April 30, 2017

Perrr-fect Country Greetings & PIP Challenge #1718

Welcome to another PIP Challenge - #1718 !!

As always the theme is anything goes ! Our sponsor is MHK Designs and all you have to do is go to the PIP Challenge Page and link up your current project image :)  MHK has generously provided the images for this week's challenge inspirations and they are giving our winner free images too!!
I am a farm girl and I just fell in love with this vintage image! It & the sentiment are perfect for my dear friend whom I don't get to see much, so next best thing . . . happy mail :)

   
I am new to digital stamping so I thought I would share some of the things I like best about it.  It is really pretty amazing how you can make an image whatever size you'd like.  For this card I set out purposefully to combine several images and on different scales.  I wrote notes on the photos so just CLICK ON THEM TO ENLARGE FOR EASIER READING if your interested.  The program I use is outdated, but I can really do a lot with it. I'm sure there are even more options with newer programs, so you'll have lots of fun exploring that!!

CHALK :)
I used a couple of uncommon elements - extra wide gold crepe paper under the image and also in the flower, paired with tulle.  The green pattern paper is actually a napkin from a friends shower. (I love this color ~ I wish I could've taken a stack of them!!!)


I had a little fun with the back of the card instead of the traditional open close card. I die cut the edge of a triangle and put it down as a pocket, then inserted a note card. I'm frugal & I thought if Cris wants to re-gift it, this way she could. {{ I hate the thought of homemade cards getting thrown away!!! }}


Sunday, April 16, 2017

A New PIP Challenge!!

Hooray! Another week and another chance to win at PIP Challenges! Challenge #1716 is anything goes  and our sponsor this week is Sasayaki Glitter

https://www.etsy.com/au/shop/SasayakiGlitterLots of great digital images available, just click the picture to follow the link. 

To remove the snowflakes I selected the freehand painting
tool, selected white and colored over each snowflake.
This digi image was generously donated to me by Sasayaki Glitter to demonstrate for you. I went pretty straight forward with it. Printing on regular white cardstock & coloring it. I did remove the snow flakes from her PJ top since I wanted to make more of a spring flavored project.


On finding this quote I knew it would be a great for an under the weather kid who is home or sick in bed. I think wrapping it inside a book will make an uplifting gift!! I simply added it to the stamp image as I was sizing it for print on a Word Doc.

I didn't do much to the back, a simple sentiment and room for a quick love note!!  Some wonderful beads, ribbon and lace to poke out of the book!  I love drippy tassels 🌠


Sunday, April 2, 2017

PIP Challenge #1714

http://pammiesinkypinkieschallenges.blogspot.com/Good Morning Friends! Time for another PIP Challenge! The Criteria is ANYTHING GOES!
& the prize is sponsored by

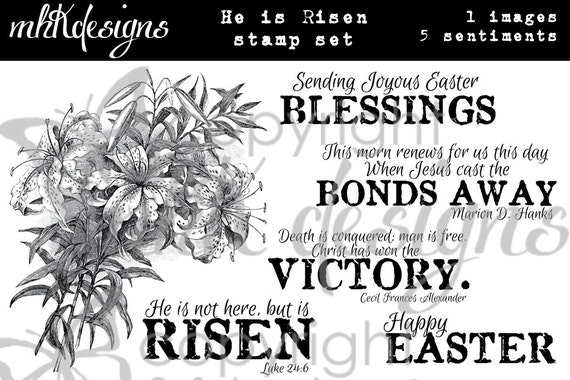
Over at MHK they have wonderful Vintage Images with Modern Sentiments ~ all ready for digital download so you'll have them quickly and can start creating right away, while your inspiration is fresh!!

I like to share a couple of images I didn't get to play with yet so here's some added inspiration to visit their site:
He Is Risen Digital Stamp Set
!! Oh! And did I mention the above SET is only $3  !!

                                                                                                                                                 For Today's inspiration I chose big lovely blossoms from "Get Well Flowers" and the sentiment Here for you Always. This is printed on watercolor paper. I am still quite a rookie at using the digital images and I love to experiment so here's what I did ~ 
I chose my sentiment and reduced it to make a background.  I reduced the color saturation in it & copied and pasted it over & over in rows to fill the area I wanted to use for my card.  I then layered the flowers over the top  and welded it al together!! For me it was so cool to discover that I could do this!!!! Then I enlarged the sentiment & had it print separately so I could easily cut it to the shape I wanted :) 
The problem I knew I would run into was that printer ink bleeds when it gets wet, so after I printed it I sprayed it with hair spray to see if that would work.  The colors don't move around like they normally would on watercolor paper but I was able to use them without the ink clouding anything up. 
I  used my Zig Watercolors to make it all pop. Then I added matching papers and washi accented with a few gems.
I liked the dimension of the over lapping layers so the back of the card is hidden behind the coral panel and opens vertically :)
Thanks for stopping by! 
I look forward to seeing your entry on PIP Challenges!
If you have any questions, leave it in the comments ;)