I have been watching with envy all the 'professional' paper crafters picking up delicate pieces and precisely placing them using an amazing tool with a tiny, tacky tip. Unfortunately, the one I would like to have is over $30!!!! Others I have read reviews on complained the tip didn't last.
If you've read my post on turning wood mounted stamps into cling stamps then you know I have fallen in love with Aleene's TACK-IT Over & Over repositionable adhesive. As I was making some glue dots with it ~ it suddenly occurred to me that it could be used on the end of any pointed object as a jewel picker!!! I used a "Sheezley" tool for ceramics but you could use a toothpick (disposable, no storage!) a dried up pen with a cap to protect the sticky, etc!
Here you can see the completely dried blob of glue I put on the tip. It is super tacky and picks up even the tiniest bead with only a gentle touch. I have even used it to clean some flecks of embossing powder off a project before heating. It can get into tiny tight places where it is hard to use even the tiniest of brushes to flick away culprit granules.
Once the tip doesn't retain the sticky (I used it a LOT!) just pull it off and put another on. Be prepared, it does take 30 minutes or so to dry, so it may be a good idea to have 2 of them so one is always ready to go.
Good luck, hope this will come in as handy for you as it has for me!! πΆ
Community Favorites
-
Hello Blogging Friends!! Welcome to my project for the "It's A Girl Thing" Turner Syndrome Awareness Inaugural Blog Ho...
-
Hello everyone! I hope today finds you feeling great and ready to craft or maybe just hang out :) WELCOME TO THE FIRST DA Y OF GROWING ...
-
Hello and welcome to the Hi~Notes stop on the GIU Blog Hop !! I have a travel Journal for you today that came about by divine accident!...
Take Note:
Thursday, April 26, 2018
Jewel Picker 101 πΆπΆ DYI πΆ
Sunday, April 22, 2018
Graduation Season!
Oh my! I am going to be facing days and weeks without one of my favorite people in the not too distant future. Another HS Graduation is at hand!!
I was so pleased that this weeks PIP Challenge Sponsor is Sasayaki Glitter! They kindly shared this great graduation image with me & it is my privilege to share my first project with it with you!!
So much happy energy in this one called Mia's Graduation. Our school colors are red & black so it wasn't difficult to decide how to color her! After water coloring with Zig Real Brush Markers I framed it with Spellbinders Nestabilities Majestic Elements Dies - Radiant Rectangles & added a wonderful little sentiment stamp from Unity Stamp Company embossed in red. I made a memory board for her loaded with her favorite pictures and put this strategically on it!!
I am pleased with the little pop of energy and color it offers. I think it will also be a stamp that makes great tags for our gifts to the other grads. Because digis are so versatile I will be making it really big for the name tags that dangle from their "Senior Baskets". So much fun & versitality!!
Now it's your turn!!! Time to make a project (anything goes!) and link it up at the PIP Challenge Blog! Be sure to share the love and check out all of the DT Blogs & your favorite entries too.
AND DID I MENTION YOU CAN WIN?!!
Sasayaki Glitter is awarding 1 lucky entrant the digi of their choice!! (Don't you just love the "win/win" of the crafting world!)
Labels:
graduation,
PIP Challenges,
Sasayaki Glitter
Monday, April 9, 2018
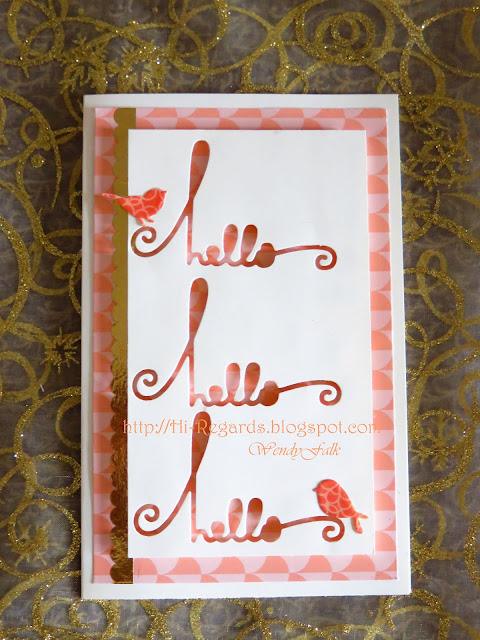
"Hello!"
Good Morning!! I hope that as the sunshine is finding you and warming your heart if not your bones this chilly but gorgeous time of year. I am so excited for the fresh light of Spring that I find myself hooked on a color theme build around icy coral and gleaming gold!! Birds are another herald of Spring here in the snowy mountains of the Pacific NW so I love using them prolifically as well!!
Today's card was inspired by the negative space left behind after die cutting the "hello" for a number of other cards. I love the look of the see through & thought why not three; the number of completeness! I am saying hello in the most happily complete way possible!!!
After cutting my panel I covered most of the back with dimensional adhesive, I didn't want any "sagging" spots. (esp since this is going through the US mail!!)
For the little bird accents I used matching coral paper dipping & heating each in embossing powder 3 times to get a nice coating - like enamel. From there it is a simple matter of layering it up and adding some gleaming gold "washi".
I think this card is pretty Clean And Simple! Fresh and new like Spring!!!!
PS - the robins are talking in the bare apple tree! Despite the snow on the deck every morning I think Spring really is on its way!
Looking for a great challenge blog? I have linked this post to "The Artistic Stamper Creative Challenge on Facebook" AND Power Poppy - the blog By Marcella Hawley!! Check 'em out!
Sunday, April 8, 2018
Spring Mornings ~ Pip Challenge 1814
When the kids were little we had an old farm house on 5 acres in the rolling hills of the Palouse. We had the only trees for miles, surrounded as we were by wheat fields. A beautiful old Beech had grown up through our patio, shading an upstairs bedroom. Oh it was lovely, throwing dappled shadows across the bricks below and casting the bedroom into a shimmering shade in the heat of the day.
That's what this lovely digital stamp "Winnie at the Window" reminds me of. It just so happens to be made by Polkadoodles who is sponsoring this weeks PIP Challenge Blog #1814~anything goes! In fact Polkadoodles is also awarding our PIP Challenge winner 3 digis of their choice!! Winnie is just one of many lovely creations you'll find at their site.(the underlined are quick links for your convience!!)
Since I most enjoy using my watercolor brush markers for coloring I printed this image out on watercolor paper. I carefully painted it being especially cautious of the lines. I could've sprayed it with workable fixative to be 100% sure the printer ink would not bleed, but I'm not always happy with the way watercolors move across it; so today I took my chances. Winnie is layered on top of 2 pieces of ridinghood red paper, the smaller is embossed with a brick pattern and then rubbed with brick colored ink for added texture.
Here is the image without added embellishments. I think she is so pretty!! In the future I will either make the card a lot bigger or find a smaller branch die because the card was a little overwhelmed by the leaves and branches!
It was also really fun adding in the bird house ~ simply tied to a branch & left to dangle. A few little flower die cuts centered with Nuvo crystal drops in black and deep purple.
I have several ideas for the sentiment. There are some great ones out there. I like the ones that mention friends, gardens, nature and birds for this one. Unity Stamp Co has one that mentions "Bird Chirping Weather" and "Hello Tweet Friend", "be my bird", "enjoy the simple things.."
I'm just waiting until I find the right person and occasion and I will stamp the sentiment & send it off!!
Once again, I'm looking forward to seeing your beautiful creations!
Remember, Anything Goes!!
If you can use any Polkadoodles images it would be a great way of thanking them for sponsoring our challenge!!
Hope you have a beautiful, bird chirping week π¦
Labels:
digi,
PIP Challenges,
Polkadoodles,
water color digital
Tuesday, April 3, 2018
New Triple Layer Dies!!
Another beautiful Easter holiday has come & gone!! Wow, time waits for no one! But what a great week it was. Our school usually doesn't have the kids out on break during Holy Week so this year was an exciting exception. Another great exception was the weather. Usually AWFUL for Spring Break this year it was lovely, they went for runs (prepping for track season!), and played with the new calf outside!!
Me? I had to work!! But it's only part time so I still got to enjoy their wonderful, young and energetic presence!! I also had time to try out a new die set❣ I used Easter-y colors to make Easter cards! The ones I didn't use I will be able to make a quick Spring Birthday, Get Well, Thank You card, etc π
Aren't they great!! Super simple, fun and fast!! Just a matter of die cutting and layering. I used spray adhesive to quickly get an all over adhesion.
HERE'S A TIP: if you would like to have glitter show in only 1 layer without bulk & rumple then spray the layer you want it on FIRST!(ie before other layers), layer the one on top of it to stick, THEN put glitter in the holes and work it in a little with a brush or finger tip. To have no sticky residue (& no glitter) be sure to always spray the top layer first (on the back of it) and work your way down in layers.
Just to help you get started with color ideas (I sometimes used only 2 layers to show more of the lower color)
They are so pretty in person! If you have any questions I'll be happy to get back to you ;)
This is so much fun. I cut several colors out of each layer and then messed with layering them up after I was done cutting. I still wound up cutting a couple of extras as I had color epiphanies all along the way!!
Since I didn't want to cover much of the card fronts, label style worked
well for me. I think gems or
Nuvo Crystal Drops would also have
added a beautiful dimension! Alas, I was in a hurry to have them done and given away!!
Me? I had to work!! But it's only part time so I still got to enjoy their wonderful, young and energetic presence!! I also had time to try out a new die set❣ I used Easter-y colors to make Easter cards! The ones I didn't use I will be able to make a quick Spring Birthday, Get Well, Thank You card, etc π
Aren't they great!! Super simple, fun and fast!! Just a matter of die cutting and layering. I used spray adhesive to quickly get an all over adhesion.
HERE'S A TIP: if you would like to have glitter show in only 1 layer without bulk & rumple then spray the layer you want it on FIRST!(ie before other layers), layer the one on top of it to stick, THEN put glitter in the holes and work it in a little with a brush or finger tip. To have no sticky residue (& no glitter) be sure to always spray the top layer first (on the back of it) and work your way down in layers.
Just to help you get started with color ideas (I sometimes used only 2 layers to show more of the lower color)
They are so pretty in person! If you have any questions I'll be happy to get back to you ;)
Don't forget to make the back pretty!!
|
This is so much fun. I cut several colors out of each layer and then messed with layering them up after I was done cutting. I still wound up cutting a couple of extras as I had color epiphanies all along the way!!
Since I didn't want to cover much of the card fronts, label style worked
well for me. I think gems or
Nuvo Crystal Drops would also have
added a beautiful dimension! Alas, I was in a hurry to have them done and given away!!
I love these sentiments!! |
He Has Risen Indeed!!
Labels:
Birch Press Dies,
card back,
cards,
Easter,
spring
Subscribe to:
Posts (Atom)