Community Favorites

Showing posts with label cards. Show all posts

Saturday, April 16, 2022

He has Risen Indeed!!

Sharing the joy as my family and I celebrate that "HE IS RISEN!"
I love the soft look the Distress Oxide  used as a watercolor on this clear embossed "iron-off" Easter card.  I love the look of iron-off and I use it to make a lot of smooth backgrounds. If you haven't ever tried it, let me warn you... it's addictive!!  It's also easy!  Here's how:
  1. Clear heat emboss your image onto paper.  I have used water color paper, heavy card stock (110lb), and lightweight (85lb) and all have worked well for me, but there are slight variations between regular and watercolor papers.  Today's roses are on light weight cardstock.
  2. Paint your paper with water reactive color.  In this example I used a paint brush to apply watery color with a splooshy effect --- respecting the outlines.  Pre Colored sprays will give you a more random look
  3. Spritz with a little water and let dry (to some of these I added shimmer powder to the water!)
  4. use a heat safe surface, placing the image face up and covering completely with a clean piece of copy paper before ironing over it (on high heat)
All of the clear embossing will be absorbed into the copy paper leaving your original image smooth and flat!  Where the embossing used to be will be white (or the color of your paper) outlines.  It is so pretty because of the way the water color appears to have pooled without line barriers!  

I think the softly pooling colors look excellent with this English Rose design.  I have also found that any image without much detail does not work well as there is too much resist (the embossed areas) and not enough space for color to beautifully pool.  

You may choose to add color in large blocks or blobs directly from the ink pad or spray bottle with equally beautiful results!  If you're using regular paper be sure not to over work it as it will pill with lots of liquid, but the curling can be reduced by anchoring your paper to a flat surface.  The ironing also restores the paper to a nice, smooth flatness!!

If you're using watercolor paper it is a good idea to anchor it to a surface and saturate with color.  Then you can heavily spray it with water and get a lot of movement in the colors - even removing harsh lines from the original inking!
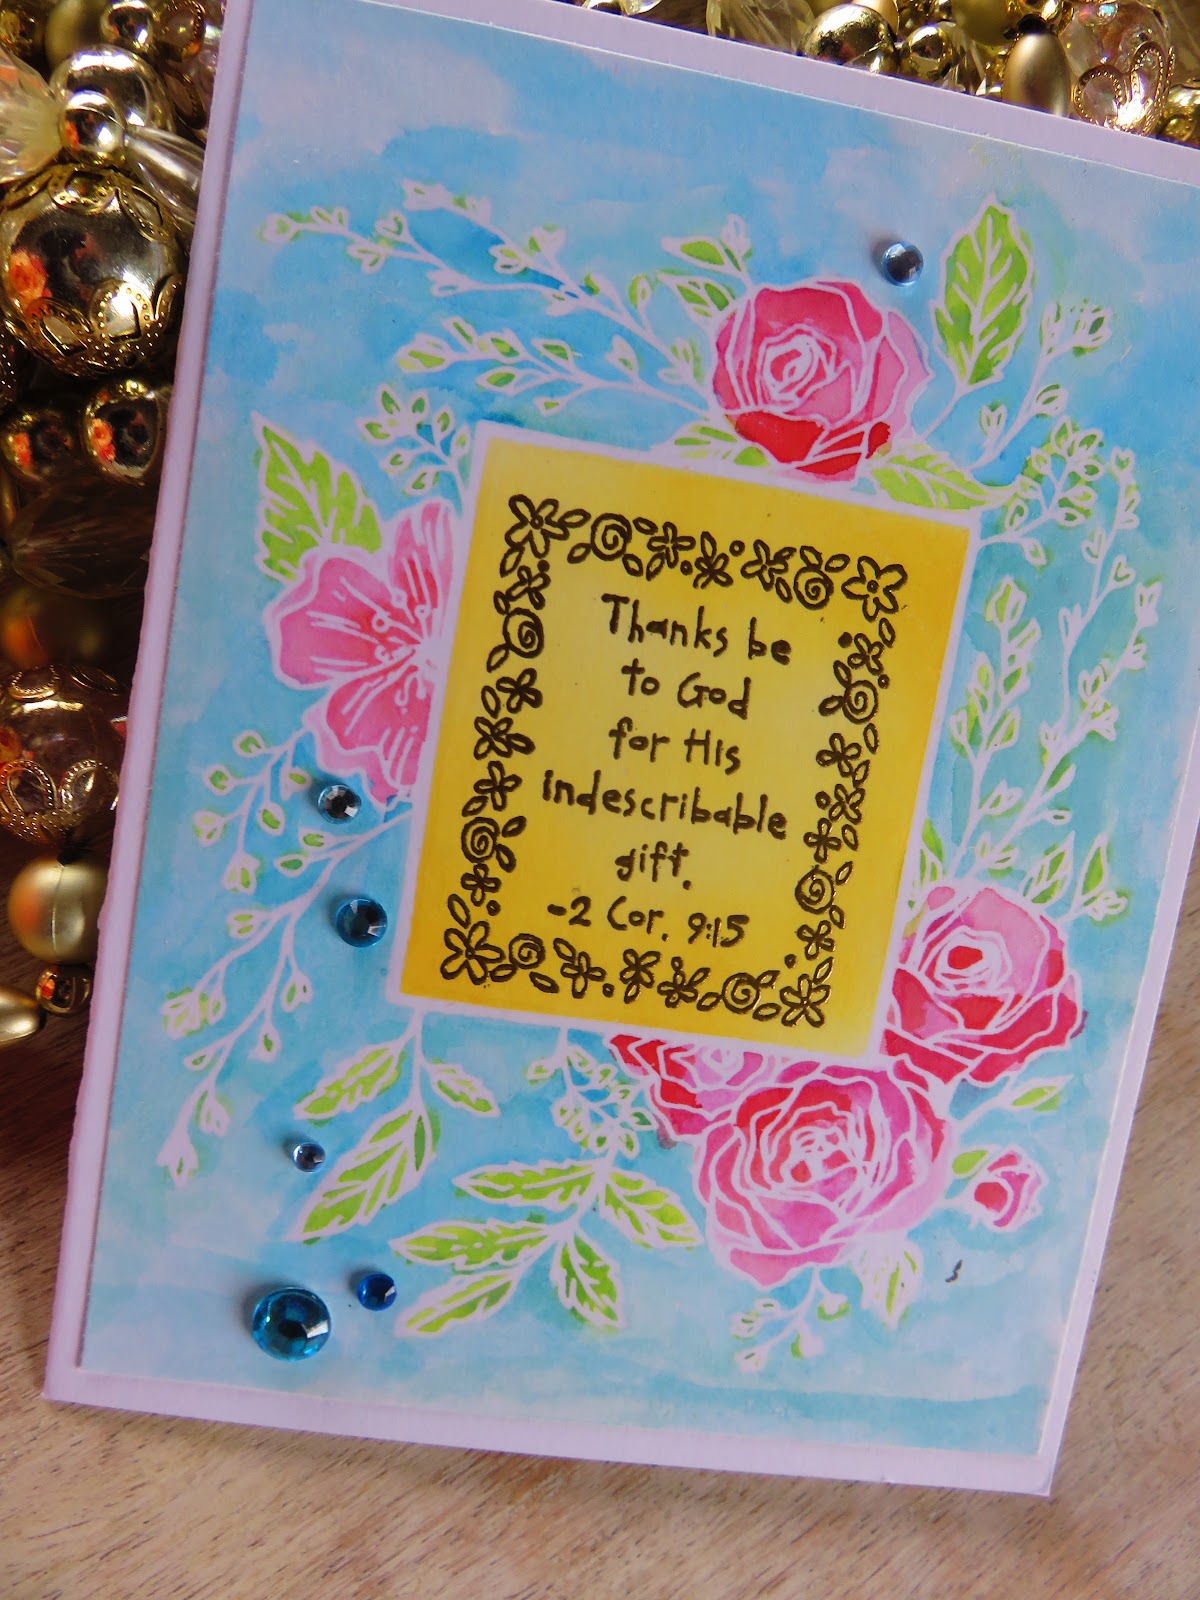

I have found that even my "fails" turn out so pretty!! Oh, here's another hint.  If you like the white lines to be more "blobby" then press your versamarked stamp with MORE pressure. This will spread out the lines as you squish the rubber down to the paper!  If you like a more crisp line then be sure to ink 2 or 3 times - with LESS pressure.  You'll know as soon as you slide the embossing powder across it and can adjust your pressure from there!

Thank You for Stopping by!

#heatembossing #cards #cardmaking #greetingcards #rubberstamping #Spring #papercrafts #paper #papercraftdesign #hinotes #timholtz #Ranger #oxideinks #distressink #ironoffembossing #unitystampco #englishrose

Monday, February 24, 2020

Beautiful Birds

I just can't get enough of these Beautiful Birds from
Unity Stamp Co's KOM Dec 2016!!

On this oversized card I first embossed them on vellum and layered it on a stamped background.  Ribbons & lace border the vellum. 

Adhesive is hidden on the back of the stamped panel as vellum & all are wrapped around it and adhered in the back.

I punched an edge on it and folded it over the dark cardstock (Island Indigo/Stampin' Up!) to help decorate the back. 

3D flowers energize the front, with centers of glossy accents over raspberry ink & sprinkled with glitter. 

So that there would be somewhere to add a note or stamp a sentiment, white embossed paper was added & rubbed with matching ink.  The single little bird was a fun for me accent!  

Thanks for stopping by to take a peek!  The following is a list of fun challenges where I've entered this card.   

https://takeaword.blogspot.com/2020/01/fowl.html


Tuesday, April 3, 2018

New Triple Layer Dies!!

Another beautiful Easter holiday has come & gone!! Wow, time waits for no one!  But what a great week it was.  Our school usually doesn't have the kids out on break during Holy Week so this year was an exciting exception. Another great exception was the weather. Usually AWFUL for Spring Break this year it was lovely, they went for runs (prepping for track season!), and played with the new calf outside!!

Me?  I had to work!! But it's only part time so I still got to enjoy their wonderful, young and energetic presence!!  I also had time to try out a new die set❣  I used Easter-y colors to make Easter cards! The ones I didn't use I will be able to make a quick Spring Birthday, Get Well, Thank You card, etc 🙂

Aren't they great!!  Super simple, fun and fast!!  Just a matter of die cutting and layering.  I used spray adhesive to quickly get an all over adhesion. 
              
HERE'S A TIP: if you would like to have glitter show in only 1 layer without bulk & rumple then spray the layer you want it on FIRST!(ie before other layers), layer the one on top of it to stick, THEN put glitter in the holes and work it in a little with a brush or finger tip.  To have no sticky residue (& no glitter)  be sure to always spray the top layer first (on the back of it) and work your way down in layers.
Just to help you get started with color ideas (I sometimes used only 2 layers to show more of the lower color) 
They are so pretty in person!  If you have any questions I'll be happy to get back to you ;)

Don't forget to make the back pretty!!

          
This is so much fun.  I cut several colors out of each layer and then messed with layering them up after I was done cutting.  I still wound up cutting a couple of extras as I had color epiphanies all along the way!!


Since I didn't want to cover much of the card fronts, label style worked
well for me.  I think gems or 
Nuvo Crystal Drops would also have 
added a beautiful dimension! Alas, I was in a hurry to have them done and given away!!

I love these sentiments!!


He Has Risen Indeed!!

Monday, December 11, 2017

Happy Birthday & BugaBoo ~ PIP Challenge 1750

Merry Christmas Season everyone!!  🎄 I am excited for all the Christmas celebrations as well as the prospect of a whole new year!!

This will be my last PIP Challenge for 2017 and I think it is such a fun one!!! Bugaboo Stamps is our sponsor this week so if you'd like a fun prize from them go to Pammies Inky Pinkys Challenges to post your card for your chance to be this weeks winner!!  

I love this sweet image ~ Birthday Puppies ~ it is so full of celebration, I think it would be a great New Year's Card, or any celebration!! Like New Baby, Graduation, New Job etc !! Check it out because 2 other fun puppy images are included in this set!


My inspiration was my package of gel pens!!  I printed the puppy image and fussy cut it, laying it on the marker set I planned to use.  Then I liked it so much I decided to mimic the look on the card!!


I did add a little shading to the puppy to give it some dimension, but otherwise I left it white. 
After cutting each strip of colored paper I used a border stamp from Stampin' Up! "Mosaic Madness" to accent the center of each strip for a monochromatic look.


I will let you in on a little secret . . . . I had every intention of making this a Happy New Year card!!  When my creative madness was satiated I looked up saw and it said birthday!!!!  {I must need a birthday card soon & didn't know it!!} Maybe I was thinking of Jesus!! We're celebrating his birth big time in my house right now!!


The little banner was made with a tiny alphabet set and some embroidery floss. I left it black and white / any amount of color would have eliminated the "PoP" I was looking for.  I think Nuvo Crystal Drops on each corner where the glue is would be a cute look too & I also plan to edge each banner piece with a little iridescent glitter!

Have fun ~ Merry Christmas & Happy New Year!  I will be looking for your entry in the PIP Challenges!

Sunday, October 29, 2017

Late Autumn Raspberries - PIP Challenge 1744

A new set at MHK Designs
Hello again PIP Fans. Time to head over to Pammies Inky Pinkies Challenge Blog for your chance to win some great images from MHK Designs !!!

They are the generous sponsors of this weeks challenge and this gorgeous image is an example of the lovely things you'll find there!  It's named "Fabulous Fall" and comes in a set of 6 images!! Can you believe this beautiful and versatile set is only $3 ?? !!  They've got lots of Vintage images, modern sentiments, digital papers!!

All you have to do is link up your paper project on the PIP Challenge Blog, "Thankful" is the theme this 5th Monday!!  Not only will lots of us get to enjoy your work of art but each week a winner is drawn!  I really look forward to seeing what you have to enter!!


                    I fell in LOVE with this Fab Fall set.  The Leaves, acorn and sentiments are stunning as is! I printed mine on plain cardstock and then tried a smooshing technique. For me, the colors absorbed into the paper too quickly so next time I'll try it on watercolor paper.  This paper was also sprayed heavily with fixative, so I was thinking the colors would float on it a little more.  The fixative did make the inks look a little grainy, so you will know what to expect if you try it. Still a pretty result I think!

To color the raspberry branch I used ink straight off the palette for intensity.  I really love the way that turned out.  I tried to let it bleed out of the lines but it absorbs so quickly that I could not achieve the look I was going for.  After making the greenery green, I added golds to the center of the leaves. and then a little "Magicals" for a frost look.

I love the simplicity of this card, the art really is the standout here.
Inside I used the MHK sentiment, inserting the "MY" from another of their sets.

So now it's your turn my friend!!  I know you have a bunch of ideas!  My wish for you today is that you find time to spend on something you love!  If that is paper crafting ~ I'll see you over at the PIP Challenges!


Sunday, September 3, 2017

Embossing on Vellum - Peonies

Wow!!  Time flies!! It's time for another inspiration card for the Weekly PIP Challenges! The theme is nearly always anything goes (as it is this week!!) and our generous sponsor is Di's Digis who is offering the lucky winner fun stuff from the Di's Digis Stamp Store!!! 

If you REALLY want inspiration, head over & pick out some things you'd like & then get a card entered in the challenge for your chance to win!!

This card was a lot of experimentation for me.  The image from Unity Stamp's "As We Go Along" which I won in a challenge!!!  (SEE!! You need to enter challenges!!) Embossed in gold on vellum is is layered over homemade sparkle paper (I used 6 inch wide double adhesive tape w/ glitter!) over the top of stamped dots rubbed with subtle stripes of color and then I embossed the leaves OVER THAT!!!

A lot of work but really FUN!! How do you know if you don't experiment once in a while!!!  I thought the whole thing looked stunning on the black/white and pink. The hot pink "hello" was the icing on the cake :)

Of course I dressed up the back!

 
Hope to see your card on the Pammies Inky Pinkies Challenge!! Have a wonderfully blessed week!

Tuesday, August 22, 2017

Fun with Newton's Nook Digis!

Inspiration for this Thank You Card came from the current
Called
Black & White, Teal & Pink.
I was excited to give this a try and here are the results!  The Digis I used were
Lots of fun to build cards based on a random inspiration ~ I hope you'll visit and enjoy all of the great entries and share yours while there :)
I used the digis printed on vellum immediately sprinkling embossing powder over the image before it could dry out. 
 
I used TH Oxide inks for the stripes and gel pen coloring on the vellum.
Fun and colorful!!


Looking for more fun challenges??
I've also entered this card in:
Simon Says Wednesday Challenge
Word Art Wednesday Challenge
The Artistic Stampers Challenge
MHK Designs: Challenge


Sunday, April 16, 2017

Easter Blessings to You!

🐰Happy Easter.  He is risen indeed!!!  Have a wonderful day 💮

Thursday, March 23, 2017

A little Birdie

Hello All! Hope you're finding time to be outside in the Sunshine!! We've had fog,  a horrific wind storm, Glorious Sunshine and then snow!!  ALL OF THIS WAS YESTERDAY!!! But a Little Birdie Told Me that Spring is here! (This is what Spring actually looks like here in the Wallowas!!)
        Looking for fun?  Time Out Challenges has a fun CASE challenge going on 
                                                                                                    and 4 Crafty Chicks as well as
Simon Says Challenges is also hosting a fun challenge this week "Simon Says: Use More Than One Die Or Punch".  I did lots of stamping and die cutting on this sweet card so I thought I would share & enter it.

I have been wanting to try stamping over shimmer so this is the product of my inspiration.  I started by stamping the music on Crumb Cake card stock and overlaying it with double sided tape.  Covering that with glitter and burnishing it on. Then I stamped the bird and branches with Brown Versa Fine and embossed over that!! It was really a fun process.

Here's a small pictoral of
my "think-tanking" !


OK ~ With a bow or without?  I couldn't decide!!